


When you’re after a portable ice bath that truly meets your recovery needs, the choice boils down to three contenders: inflatable tubs, collapsible tubs and quick-freeze units. Each brings a distinct balance of setup speed, portability and temperature precision. Here’s a glance at how they compare so you can zero in on the right fit.
Quick Comparison Of Portable Ice Bath Options
From beach circuits to compact home gyms, these three styles let you enjoy cold-water therapy without a permanent install.
- Inflatable Tubs deploy in under 5 minutes with just a pump and water—perfect for park or coastal sessions.
- Collapsible Tubs combine rigid walls with a fold-flat design, slipping neatly into tight gym corners or storage.
- Quick-Freeze Units integrate refrigeration to hold sub-5°C temperatures on demand—ideal for daily or studio use.
Comparison Of Portable Ice Bath Types
Below is a snapshot comparing the three most popular portable ice bath designs, ideal scenarios, assembly times and price points.
| Type | Ideal Use Case | Setup Time | Starting Price |
|---|---|---|---|
| Inflatable Tub | Beach workouts | 5 minutes | AUD 250 |
| Collapsible Tub | Home gyms | 10 minutes | AUD 400 |
| Quick Freeze Unit | Commercial or frequent | 30 minutes | AUD 1,800 |
Use this overview to see at a glance which style fits your schedule, space and budget.
Key Trade Offs For Each Style
Each design draws a line between speed, stability and investment. Your primary recovery routine will guide the perfect match.
Beach Or Outdoor Athletes
If you’re packing up for sandy stretches or grassland sprints, inflatable tubs win on rapid deployment and low carry weight. Just inflate, fill and you’re chilling in minutes.
Home Gym Enthusiasts
Collapsible tubs strike a balance between sturdy walls and compact storage. They hold their shape under your weight and tuck away just as easily after the cooldown.
Studios And Heavy Users
Quick-freeze units demand a higher upfront spend but repay it with precise temperature control—no ice bags required. They shine in high-frequency settings where every degree matters.
Quick-freeze units hold a consistent chill without lugging ice—perfect for daily recovery routines.
To compare models side by side, browse our full portable ice bath collection.
All prices are GST inclusive.
Learn more about portable ice bath options for athletes in our article: Comparing Portable Ice Baths and Inflatable Options for Athletes.
Different Portable Ice Bath Types
Finding the right portable ice bath hinges on your routine. Inflatable tubs marry affordability with ultra-lightweight design, making them perfect for impromptu outdoor dips. Collapsible tubs, on the other hand, offer sturdy sides yet fold away neatly into a slim profile—ideal for a home gym on a budget. If you crave constant, precise chills, quick freeze units step in with their integrated cooling systems, maintaining sub-5°C temperatures on demand.
Picture this: you’re at the beach, unpack a tub that inflates in under 5 minutes, and immerse yourself beside the surf. Back home, your collapsible tub folds flat against the wall, leaving floor space free for your morning yoga on a yoga mat. Or imagine a fitness studio where a quick freeze unit stands ready—no ice bags required—to deliver that consistent chill every single session.
Australia’s appetite for cold plunges is growing fast, with the market hitting USD 8.7 million in 2023 and forecast to surge to USD 12.5 million by 2030. Portable models are leading the charge in coastal hubs like Sydney, Melbourne and the Gold Coast. Learn more about this trend in the full Australia cold plunge tub market report.
Inflatable Tub Overview
Inflatable tubs typically use robust PVC or vinyl to hold water; they inflate quickly via a garden hose and rely on air chambers for support. Their light build means one person can carry them to a park or the sand dunes without breaking a sweat.
- Portability: Packs down to fit a shoulder bag
- Setup Speed: Ready in under 5 minutes
- Water Capacity: Generally 150–200 litres
Collapsible Tub Advantages
Collapsible tubs combine durable vinyl walls with rigid supports that “pop” into shape when opened. After use, they collapse into a panel less than 5 cm thick, sliding easily under a meditation cushions or behind gym equipment. Many owners lay them on rubberised flooring to protect surfaces from drips and spills.
| Feature | Inflatable Tub | Collapsible Tub |
|---|---|---|
| Material | PVC / Vinyl | Heavy-duty vinyl with reinforced frame |
| Folded Footprint | Medium-sized carry bag | Flat panel under 5 cm |
| Setup Time | 5 minutes | 10 minutes |
Quick Freeze Unit Benefits
Quick freeze units blend a tub with an electric chiller, giving you on-demand sub-5 °C water without hauling ice. They’re a staple in commercial studios and dedicated home gyms, especially when daily recovery is non-negotiable.
These systems eliminate ice waste and ensure exact temperatures, making them indispensable for athletes and trainers focused on consistent recovery.
Installed in a garage or covered patio, they plug into a standard outlet. Many place them next to spin bikes or reformers, so you can roll off your workout straight into cold therapy. The initial investment is higher, but the convenience and energy savings pay dividends over time.
Here’s a common practice graphic from cryotherapy research:
Real-World Setups
- Gold Coast Surfer: Inflates a tub beside the dunes, fills it in five minutes, plunges after dawn waves, then savours a hot matcha powder drink.
- Melbourne Home-Gymer: Slides a flat tub under their meditation cushions, sets it on a non-slip mat, and pairs cold sessions with an essential oil diffuser collection for a soothing atmosphere.
- Sydney Studio Owner: Positions a quick freeze unit beside a humidifier and meditation cushions; clients rinse off post-plunge with Teelixir electrolytes.
Explore these setups and more in our portable ice baths collection.
Summary Of Formats
- Inflatable: Inflates fast, packs small, beach-ready.
- Collapsible: Rigid walls, flat storage, home-gym friendly.
- Quick Freeze: Plugs in, sustains exact temperatures, built for frequent use.
Choose the best portable ice bath for your lifestyle and browse our collection of portable ice baths to get started.
Next, we examine key features such as shell materials, insulation, capacity, chilling system and portability details to guide your buying decision.
Key Features Of Portable Ice Baths
Finding the right portable ice bath means understanding how materials, insulation, capacity and chilling methods perform in real-world settings. Every detail—from shell thickness to cooling mechanism—shapes how long you stay in sub-10 °C water without constant refills or ice topping up.
Shell Materials And Durability
Your bath’s outer shell is its first line of defence against punctures and everyday wear. PVC and heavy-duty vinyl are the go-to choices, each with distinct trade-offs.
- Vinyl offers greater abrasion resistance and often feels firmer under pressure.
- PVC makes the unit lighter and easier to carry, though welded seams can wear faster.
- Most kits include repair patches so you can mend small leaks and keep training on schedule.
Insulation Strategies
Keeping the cold in is just as important as keeping the heat out. Manufacturers use foam cores, reflective films and dual-layer walls to slow down ice melt and temperature rise.
“Walls that trap cold slow melting ice,” says a sports physiologist.
- Foam cores add structural strength and boost R-value.
- Reflective inner films deflect sunlight and ambient heat.
- Removable liners make cleaning easy and allow the tub to dry completely between sessions.
Feature Comparison Across Portable Ice Bath Styles
Below is a quick breakdown of how inflatable tubs, collapsible tubs and quick-freeze units stack up in key areas. Use this as a starting point to match your routine with the right style.
| Feature | Inflatable Tub | Collapsible Tub | Quick Freeze Unit |
|---|---|---|---|
| Material | PVC or vinyl | Heavy-duty vinyl | Stainless steel shell with insulation |
| Insulation | Minimal | Foam-lined walls | Integrated refrigeration + foam |
| Capacity | 150–200 L | 200–250 L | 200–300 L |
| Setup | Inflate & fill | Unfold & fill | Plug in & cool (requires outlet) |
This table highlights why each style suits different needs—whether you prize ultra-lightweight portability or precise temperature control.
Capacity And User Fit
Volume determines how deep you sit, how quickly the water chills and how long it holds temperature.
- 150–200 L: Ideal for solo dips and fast fills.
- 200–250 L: Gives you full-body immersion—torso, arms and legs.
- 250–300 L: Perfect for sharing or longer sessions without ice top-ups.
Chilling Options
You’re spoiled for choice: ice-only setups or built-in electric chillers. Manual tubs rely on block ice and need regular top-ups. Electric chillers keep water between 1–5 °C automatically and usually plug into a standard power point.
Portability And Setup Requirements
How you move and store your ice bath can make or break your on-the-go routine. Inflatable models often pack into a 20 L carry bag. Collapsible tubs fold to under 5 cm thick for stashing under benches. Quick-freeze units weigh up to 50 kg and need a firm, level surface.
- Measure storage space to ensure the folded tub fits neatly.
- Check the carry bag’s dimensions against your gear.
- Plan for power access if you opt for an electric chiller.
Real-World Performance Insights
In one garage-gym test, a collapsible tub with foam lining held 8 °C for 14 hours straight. On a sunlit deck, an inflatable model warmed by 2 °C over eight hours. Quick-freeze units maintain a rock-steady temperature—no manual ice loading required.
“Consistent temperature is key for performance recovery,” says a professional coach.
Weekend warriors often stick with inflatables for their simplicity. Coaches running back-to-back clients tend to lean on built-in chillers.
Selecting Your Ideal Feature Set
Match durability, insulation level, capacity and portability to your unique routine:
- If you chase waves or travel light, an inflatable tub may be best.
- Home-gym users or group trainers often pick collapsible tubs or quick-freeze units.
- Factor in storage space, power availability and cleaning time before deciding.
Explore our curated selection of portable ice baths on Wellness Apothecary to compare models and secure your perfect recovery companion.
Click through to browse the full portable ice baths collection.
Choosing a setup through nuanced comparisons leads to smarter investments and a smoother cold-therapy experience.
Quick Feature Checklist
- Material: Check puncture-resistance ratings (e.g., 200–300 inflation cycles).
- Insulation: Decide between foam lining or reflective coatings.
- Capacity: Ensure litre range matches your height and immersion goals.
- Cooling: Pick ice-only if you don’t need power, or electric for hands-free control.
- Portability: Confirm pack-down size and weight fit your storage and transport needs.
Using Portable Ice Baths Safely
Jumping into a cold plunge can be exhilarating, but it demands respect for temperature and timing. Aim for 10°C to 15°C when you’re just starting out. For experienced users chasing deeper recovery, brief dips in 4°C to 8°C work—once you’ve built up tolerance.
After your session, spread out a yoga mat for gentle stretching, and settle on a meditation cushions to deepen your post-plunge calm.
Measuring water temperature with a reliable thermometer is essential. That way, you stay safe from sudden cold shock and get the most from each session.
Recommended Temperature And Duration
Begin with short, tolerable exposures to let your body adjust. And always listen to your sensations.
- Beginners: 10–15°C, up to two minutes
- Intermediate: 8–10°C, slowly inching past three minutes
- Advanced: 4–8°C, under supervision, max five minutes
Start with one to two minutes and add around 30 seconds each visit. This gradual build-up not only reduces risk but also maximises the benefits of cold therapy.
Acclimation Methods And Safety Checks
Dip your feet and hands first—about one minute—before full immersion. Then, increase depth and duration by roughly 30 seconds each time. This steady approach helps stabilise heart rate and breathing.
“Gradual immersion is key to safe cold exposure,” says a certified sports physiologist.
| Safety Check | Action |
|---|---|
| Health Screening | Consult doctor if you have cardiovascular conditions |
| Slip Prevention | Use non-slip mats and steady seating |
| Companion Supervision | Have someone nearby until you adapt |
| Temperature Monitoring | Use a digital thermometer for precise readings |
Maintenance And Hygiene Tips
Clean water is your best defence against mould and bacteria. Change it every 48 hours or treat it with a skin-safe sanitizer.
Inspect the tub’s shell and seams weekly for any signs of wear. A well-maintained best portable ice bath holds chill longer and avoids costly repairs.
- Cleaning Supplies
• Mild detergent or spa-specific cleaner for inner surfaces - Leak Prevention
• Patch kits and seam reinforcers for peace of mind
After each plunge, drain completely and let the tub dry. This simple habit stops odors and keeps your setup fresh.
When To Seek Medical Advice
Cold exposure causes vasoconstriction and can strain the heart. If you have any of the following, talk to a healthcare professional first:
- Cardiovascular disease
- Hypertension
- Respiratory conditions (e.g., asthma)
- Cold-induced urticaria or Raynaud’s syndrome
- Pregnancy
If you feel dizzy, experience chest pain or extreme numbness, end the session. Logging your reactions in a recovery diary helps practitioners fine-tune your protocol.
Case Study: A weekend runner with mild hypertension cut sessions to one minute at 12°C until cleared by a doctor. Over time, they progressed safely to longer immersions.
Learn more about safe home plunges in our guide on how to do an ice bath at home.
Preventing Slips And Falls
Wet floors around ice baths are a real hazard. Layer a non-slip yoga mat or rubber tiles beneath and around your tub.
Keep water-resistant footwear handy for getting in and out. A quick-dry towel at arm’s reach also stops pooling water.
- High-Grip Yoga Mats
Textured surfaces lock down your tub’s base. - Water-Resistant Footwear
Neoprene or rubber soles boost traction. - Quick-Dry Towels
Prevent slip hazards by wiping drips immediately. - Adequate Lighting
Ensure you see every corner of your setup.
Sticking to these guidelines will keep you safe and confident in your cold plunge routine. As you gain experience, revisit and adjust your approach to unlock consistent recovery gains. Enjoy safer cold therapy!
Price And Value Analysis For Portable Ice Baths
The world of portable ice baths stretches from budget-friendly models under AUD 1,500 to high-end chillers approaching AUD 5,000. We’ll unpack what you really pay for, from upfront costs to ongoing expenses.
Understanding the total cost of ownership – initial price, electricity bills, ice top-ups and warranty terms – brings clarity. That way, you can choose a setup that fits your training routine and recovery goals.
Key Cost Factors
- Initial Price: One-off cost for the tub and any extras.
- Electricity Consumption: Annual power bill for units with built-in chillers.
- Ice Usage: Yearly spend on bags of ice for manual-fill models.
- Maintenance Expenses: Replacement liners, seals and cleaning supplies.
- Warranty Coverage: Length and scope of protection.
Budget Models Under 1500
Entry-level tubs hover around AUD 1,500. They inflate or unfold in minutes and fill with block ice for solid cold therapy. Ideal for home use, beach sessions or pop-up studio events.
Portable ice baths in Australia-New-Zealand are forecast to grow at a 7.2% CAGR through 2035, with entry models starting at AUD 1,500 driving 60% of residential sales thanks to affordability and quick setup under 10 minutes. Learn more about these market trends at Future Market Insights.
Most budget tubs rely solely on block ice, costing around AUD 300 annually. Warranties usually run 1 year, covering punctures and minor seam repairs.
Features Of Entry-Level Tubs
- Manual Ice Fill: Quick but requires lifting and pouring.
- Light Weight: Easy to transport but less effective at retaining chill.
- Basic Insulation: Lower upfront cost, shorter cold retention.
Premium Chiller Units
Premium systems range from AUD 3,500 to AUD 5,000. They integrate electric chillers for precise, on-demand temperatures of 1–5 °C, slashing most manual ice work.
“Integrated chillers improve consistency and reduce waste,” says a recovery specialist.
These units add about AUD 200 per year to your power bill and only need top-up ice costing roughly AUD 100 annually. Most come with 2–3 year warranties and optional service plans for extra peace of mind.
Comparison Table Of Ownership Costs
| Model Tier | Initial Price | Electricity Cost p.a. | Ice Cost p.a. | Warranty |
|---|---|---|---|---|
| Budget Entry | AUD 1,500 | AUD 0 | AUD 300 | 1 Year |
| Mid-Range Tub | AUD 2,800 | AUD 50 | AUD 200 | 2 Years |
| Premium Chiller | AUD 5,000 | AUD 200 | AUD 100 | 3 Years |
Selecting The Best Option
How often you’ll use the bath and how quickly you need it ready should guide your choice. Daily trainers and studio owners often get better ROI from chiller units. Casual users will appreciate the simplicity of budget tubs.
Checklist For Value Maximisation
- Match Price to Usage: Occasional dips? Stick with entry-level. Daily therapy? Invest in a chiller.
- Evaluate Running Costs: Compare electricity bills versus ice spend.
- Check Warranty Length: Longer coverage can save surprise costs.
- Assess Portability: If you move frequently, lighter models win.
- Post-Session Nutrition: Don’t forget to refuel with a plant-based protein powder or a Teelixir supplement.
Browse our portable ice bath collection to compare specific models and secure your ideal cold therapy companion.
Consider pairing your bath with a yoga mat or meditation cushion for post-plunge stretching and relaxation. Explore matching accessories in our activewear collection and meditation cushions.
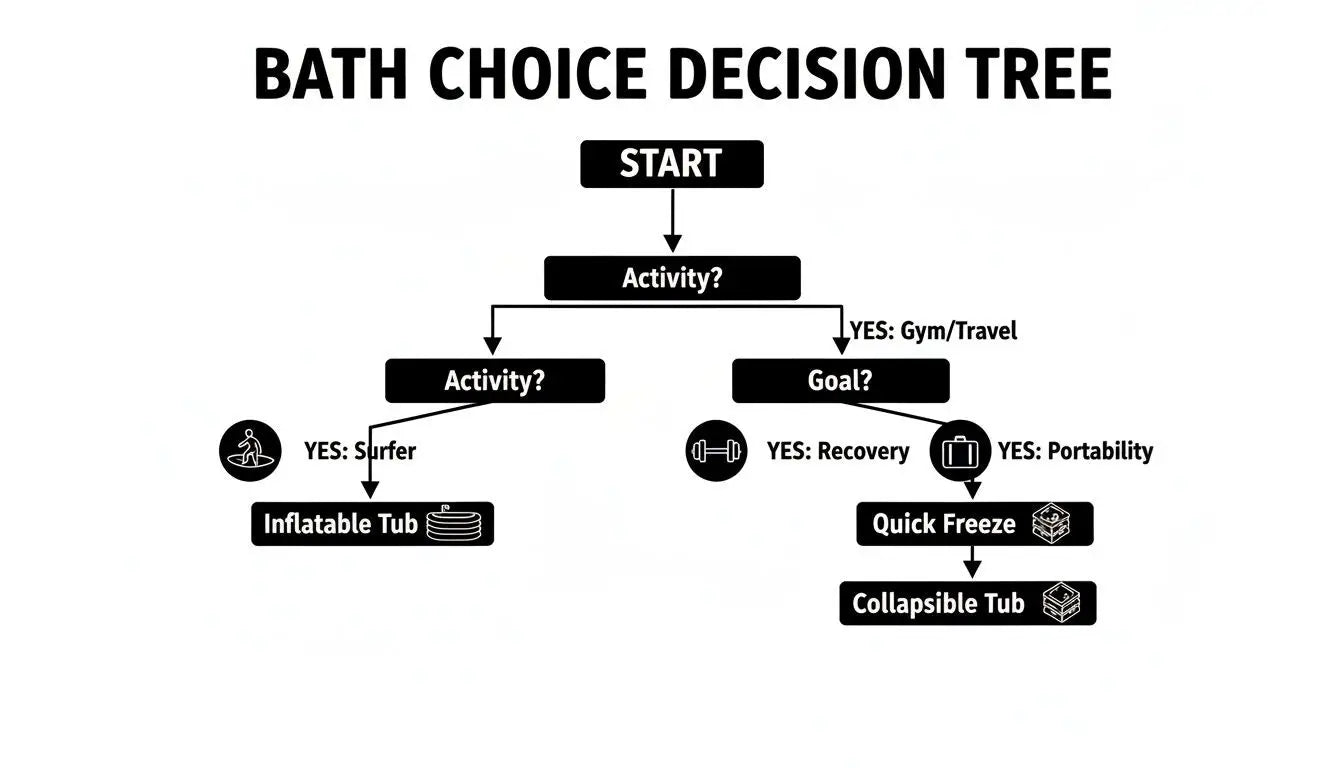
How To Choose The Right Portable Ice Bath
Figuring out which portable ice bath suits you comes down to three things: your activity, where you’ll use it and how you stow it away.
Whether you’re riding dawn waves on the Gold Coast, running a busy studio or criss-crossing the country, matching your routine to one of these styles means you won’t be left hanging.
This guide pairs inflatable tubs, quick freeze units and collapsible tubs with real-world advice on climate resistance, pack-down speed and footprint.
Comparison At A Glance
| Bath Type | Ideal User | Setup Time | Portability |
|---|---|---|---|
| Inflatable Tubs | Surfers | Under 5 mins | Packs into surf bag |
| Quick Freeze Units | Gym Owners | Around 10 mins | On wheels, plug-and-play |
| Collapsible Tubs | Travellers | Under 2 mins | Folds to 5 cm flat |
Below, an infographic shows how each profile links to a specific portable solution.
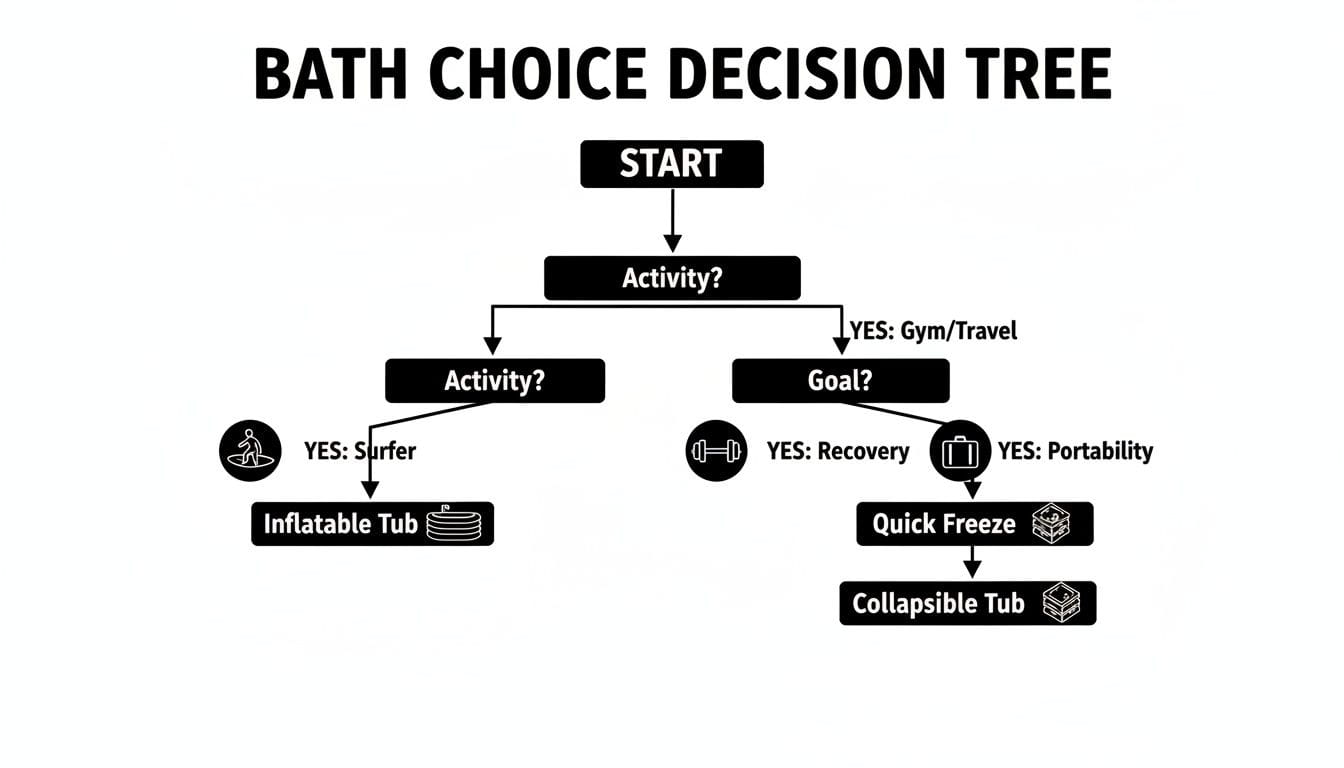
Inflatable tubs fit beach days, quick freeze units power studio sessions, and collapsibles travel light.
Surfer Profile
Surfers battle sand, salt and rocky ground. An inflatable tub built from reinforced PVC or vinyl is your best bet.
- Robust shell: Stands up to abrasive board grips and sandy set-ups.
- Fast deployment: Inflates in under 5 minutes with a simple hand pump.
- Compact pack-down: Slides into your board bag alongside wetsuit and wax.
If you’re doing multiple dips in one morning, look for models that hold 4–8 °C without constant ice top-ups.
Gym Owner Profile
A studio demands reliability and consistency. That’s where a quick freeze unit shines.
“Predictable temperatures equal predictable recovery,” notes a fitness centre manager.
- High throughput: Handles back-to-back plunges with ease.
- Plug-and-play: Runs from a standard power point—no electrician needed.
- Warranty peace of mind: Aim for at least 2-year coverage on the chiller.
Don’t forget to check noise ratings and add drip trays for a clean, slip-free floor.
Traveller Profile
Long-haul adventurers need something that packs down almost invisibly. Enter the collapsible tub.
- Slim fold: Collapses flat to under 5 cm, perfect under a seat or in a boot.
- Featherweight: Keeps your luggage light, even when combined with camping gear.
- Quick set-up: Unfold, lock the frame and you’re ready in seconds.
In chillier locales, an insulated liner will keep your water cold without constant ice refills. Pair with a portable essential oil diffuser collection or a travel humidifier to warm up your space post-plunge.
Decision Checklist
Ensure you tick these off before you buy:
- Define your main environment (beach, gym or travel).
- Match storage size to your space.
- Confirm power access if you need a refrigeration unit.
- Review material durability for sun, salt or rough terrain.
- Compare carry weight and handles to your mobility needs.
Once you’ve nailed these points, you’re set to choose the best portable ice bath for your lifestyle. Browse our curated portable ice baths collection to find the perfect match.
Final Considerations
Australian conditions can be harsh—opt for UV-resistant exteriors and reflective insulation to fend off intense sun.
Rinse liners after each use and occasionally treat them with a mild spa cleaner to prevent build-up and keep everything hygienic.
To round out your recovery routine, consider adding:
- Yoga mats for stretching and drying off.
- Meditation cushions to settle into post-plunge calm.
- Quick-dry activewear that wicks moisture as you warm up.
- A simple matcha powder tea ceremony or a drop of blue lotus oil in your diffuser can elevate cold therapy into a full-body ritual.
- Post-plunge, a shake made with our protein powder or a Teelixir supplement supports muscle repair and keeps you primed for the next session.
Ready To Decide
From dawn surf sessions to studio playlists and cross-country adventures, your day-to-day needs determine which ice bath ticks every box.
Arm yourself with these insights, pick the model that aligns with your rhythm and climate, and step into reliable cold therapy every time.
Begin your journey to consistent recovery by exploring the portable ice baths collection today.
Expert insight guarantees you’ll choose the best portable ice bath for your goals.
Frequently Asked Questions About Portable Ice Baths
Cold therapy sparks plenty of questions once you’ve picked your tub. Below, you’ll find hands-on advice and expert tips to refine every plunge.
Ideal Water Temperature For Recovery
Dialling in the right chill can speed muscle repair and calm inflammation. Many newcomers feel comfortable around 10–15 °C, while seasoned pros often work down to 1–4 °C.
| User Level | Temperature Range | Session Duration |
|---|---|---|
| Beginner | 10–15 °C | 1–2 minutes |
| Intermediate | 4–10 °C | 2–3 minutes |
| Advanced | 1–4 °C | 3–5 minutes |
Shorter dips at lower temperatures can also trigger hormonal benefits—just add gentle movement right after your plunge. For instance, marathon runners frequently choose 4–8 °C soaks to help clear lactic acid faster.
Recommended Frequency Of Water Changes
Keeping your ice bath water clean protects your skin and prevents bacterial build-up. Follow these simple steps:
- Change water every 48 hours for routine use.
- Treat spots with a skin-safe sanitizer or mild detergent.
- Inspect seals and fittings weekly for leaks or mould.
- In hot, humid conditions, swap water every 24 hours or boost sanitiser use.
By sticking to this schedule, you’ll keep your ice bath safe and hygienic.
Professional Installation For Quick Freeze Units
Most quick-freeze systems are truly plug-and-play. They pull around 1–2 kW and fit standard Australian power points.
Most quick-freeze systems require only a standard power point and no specialist plumbing.
Simply place the unit on a level surface and add a drip tray to prevent spills. For detailed performance validation, learn more about how portable ice baths work.
Enhancing Your Plunge With Aromatherapy
Introducing subtle scents can transform a routine plunge into a full-body ritual. A portable diffuser from our essential oil diffuser collection keeps fragrances consistent.
- Eucalyptus: Clears airways and refreshes.
- Lavender: Promotes deep relaxation.
- Peppermint: Uplifts energy and focus.
Setting up your diffuser beside the tub layers in a sensory element that helps both mind and body recover.
Ready for your best portable ice bath journey? Discover the full range at Wellness Apothecary


