


To really get the most out of resistance bands, you’ve got to start with the basics: picking the right one for your goals and keeping the tension consistent through every single movement. The real magic happens when you control both the stretch and the return. This keeps your muscles fired up the entire time, turning a simple elastic band into a powerhouse for building strength and stability.
Your Guide To Choosing The Right Resistance Band
If you're new to resistance bands, you're about to discover one of the most versatile and effective pieces of kit in the fitness world. But before you jump in, it's worth understanding what makes them tick and how to choose the right one for you.
Unlike dumbbells that rely on gravity, bands provide something called variable resistance. What does that mean? The more you stretch the band, the greater the tension. This challenges your muscles most at their strongest point, which is a game-changer for building functional strength.
This unique feature is fantastic because it forces all those smaller, stabilising muscles to wake up and get involved. It’s something you don’t always get with traditional weights, leading to more balanced strength, better posture, and a lower risk of injury.
The Different Types of Bands Explained
Not all bands are the same. Each type is designed for a specific purpose, and grabbing the right one will make a huge difference to your workout and your results. Let's break down the main players.
You'll generally come across three common types:
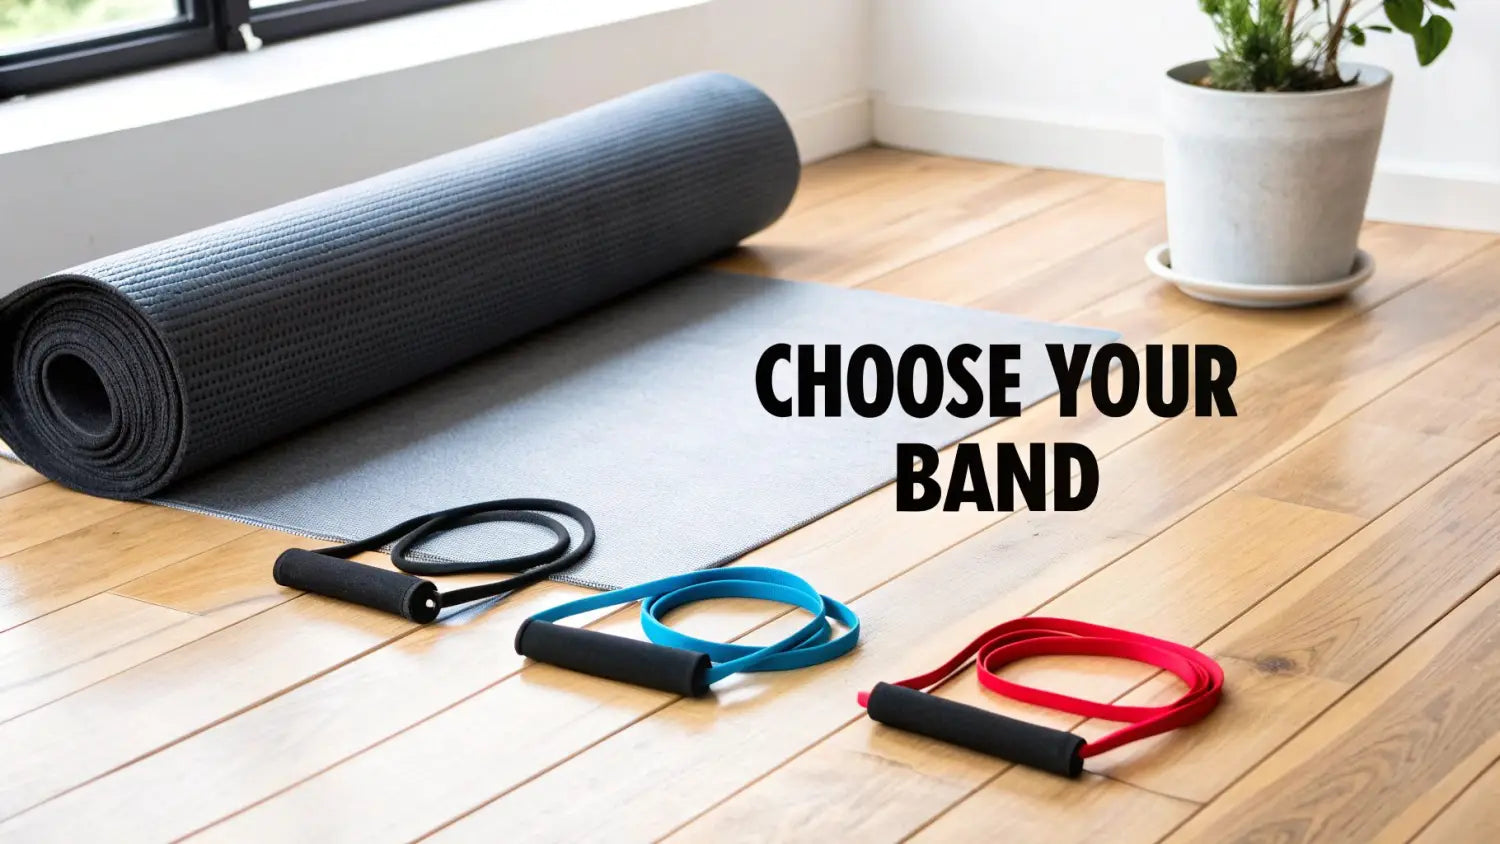
- Loop Bands: These are the thick, continuous loops you often see called "super bands" or "pull-up bands." They’re incredibly versatile – perfect for adding a challenge to bodyweight moves like squats and push-ups, helping you nail that first pull-up, or for serious strength work.
- Tube Bands with Handles: These look a bit more like traditional gym equipment, with handles on each end. They're brilliant for replicating dumbbell or cable machine exercises like bicep curls, chest presses, and rows. Our complete Tube Resistance Band Home Gym Kit has everything you need to mimic a full gym session right at home.
- Therapy Bands: These are the thin, flat bands without handles. They offer lighter resistance and are typically used for rehabilitation, physical therapy, and mobility exercises designed to activate smaller, more delicate muscle groups.
Making the Right Choice for Your Goals
So, which band should you go for? It really comes down to what you're trying to achieve. Are you aiming to build serious muscle, recover from an injury, or just add a bit of flexibility to your routine? Your goal is your guide.
This handy table breaks down the most common types of resistance bands to help you find the perfect match for your fitness ambitions.
Which Resistance Band is Right for You?
| Band Type | Primary Use | Best For | Resistance Level |
|---|---|---|---|
| Loop Bands | Strength training, pull-up assistance, adding resistance to bodyweight exercises. | Compound movements like squats, deadlifts, and assisted pull-ups. | Medium to Extra-Heavy |
| Tube Bands with Handles | Replicating traditional gym exercises, full-body workouts. | Bicep curls, chest press, shoulder press, rows. | Light to Heavy |
| Therapy Bands (Flat Bands) | Rehabilitation, physical therapy, mobility, and activation exercises. | Gentle stretching, pre-workout warm-ups, and recovery. | Extra-Light to Medium |
Ultimately, choosing the right band comes down to matching the tool to your specific goal, whether that's building raw strength or gently rehabbing an injury.
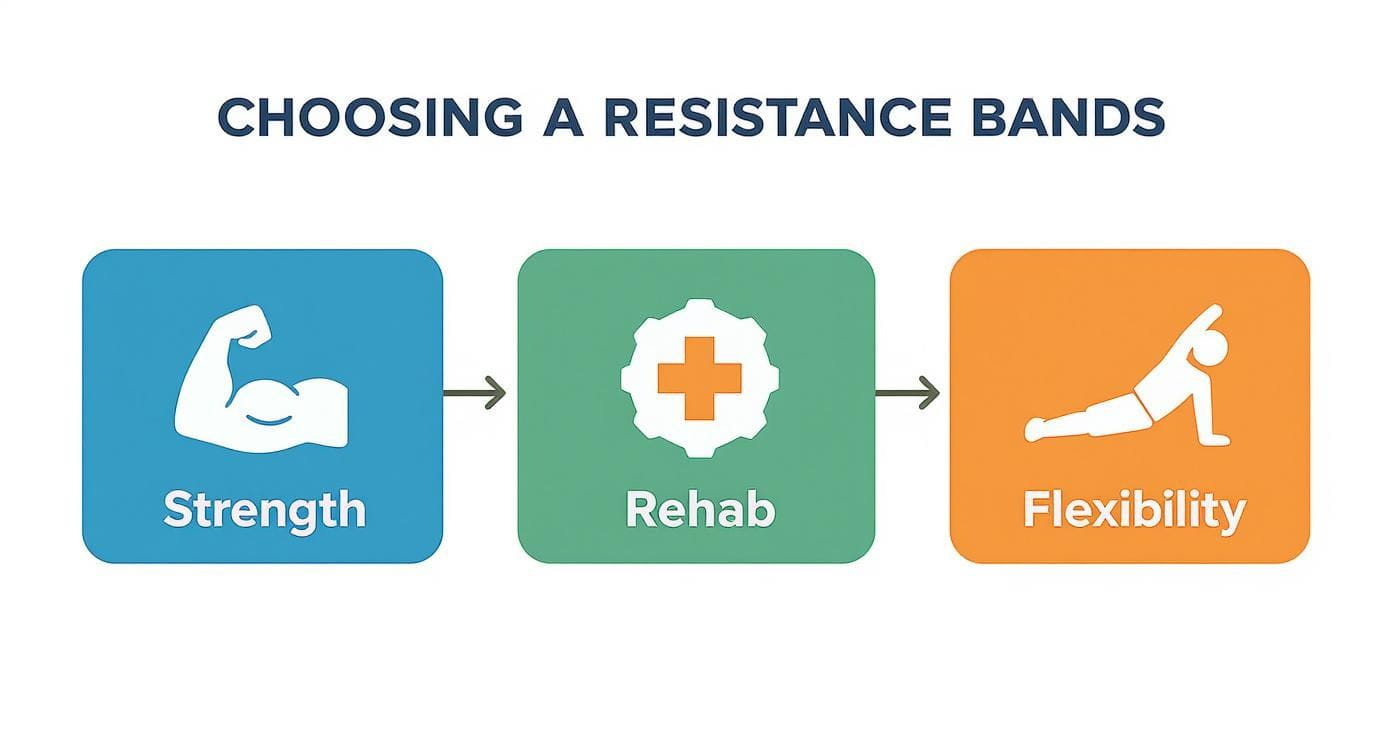
As you can see, loop and tube bands are your go-to for strength, while the flat therapy bands are tailored for recovery and flexibility. Here in Australia, resistance bands have exploded in popularity, thanks to our active lifestyle and the convenience of working out from home. It's estimated that everyday people like us make up about 60% of the resistance bands market, which just goes to show how much we love our home fitness routines.
Picking the right band isn’t just about the style—it’s also about the resistance level. Most bands are colour-coded to show their strength, from extra-light to extra-heavy. A good rule of thumb is to choose a band that makes the last two reps of your set feel tough, but still doable with good form.
One of the best things about bands is how portable and affordable they are, making them a brilliant addition to any home gym. You can get a killer full-body workout in a tiny space, especially if you pair them with a good-quality yoga mat for comfort during floor exercises. This simple duo opens up hundreds of exercise possibilities without needing any bulky or expensive gear.
Mastering Core Techniques for a Safe Workout
Alright, you've got your band. Now comes the important part: learning how to use it safely and for maximum impact. Just yanking on a piece of elastic won't cut it.
Nailing a few key techniques from the get-go will protect you from injury and seriously level up your results. Think of it as laying the groundwork for a successful workout before you even do a single rep. When you get the technique right, you're making sure the right muscles are firing and you're tapping into the unique benefits a resistance band offers.
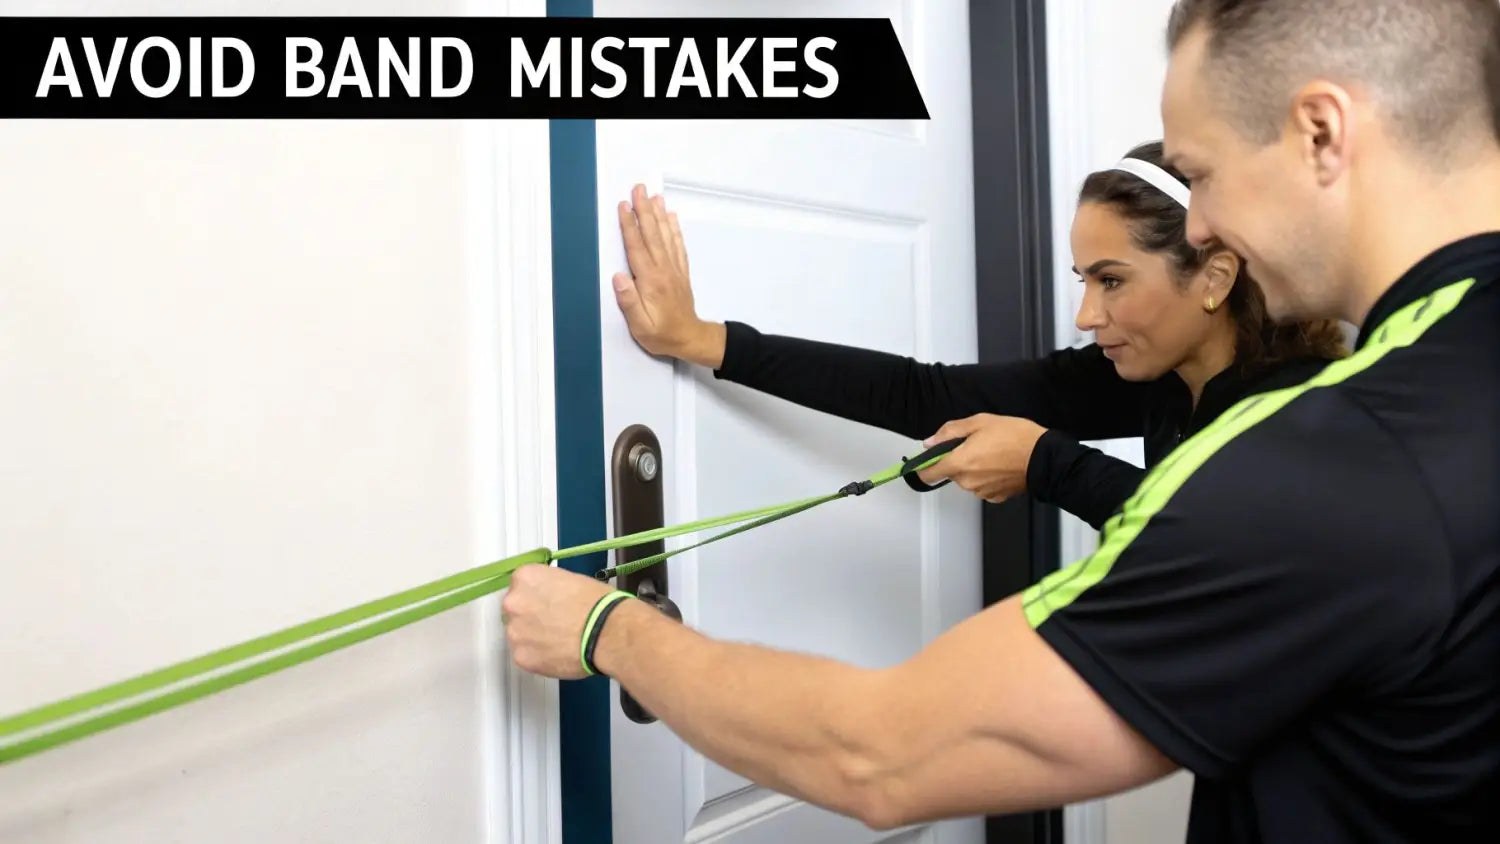
Creating a Secure Anchor Point
A lot of the best resistance band exercises need a solid anchor point—something sturdy and unmoving that you can loop your band around. If your anchor isn't secure, the band could slip or snap back, which is a massive safety hazard. The right anchor really just depends on your space and the move you’re doing.
Here are the most reliable options I've come across:
- Your Own Body: Don't overlook the anchor you always have with you. For moves like squats, glute bridges, or bicep curls, simply standing on the band or looping it behind your back works perfectly. You create the tension using your own body.
- A Sturdy Post or Column: Got a solid pole, a structural column, or even some securely installed playground equipment? These are fantastic for exercises like rows, chest presses, and wood chops. Just be sure to give it a good shove first to make sure it's completely stable.
- A Door Anchor: Most tube band sets come with a door anchor for a reason—they're incredibly useful. It’s a simple little tool with a foam stopper on one end and a loop on the other. You just wedge the stopper on the far side of a solid, closed door (one that opens away from you is best), and you've got an instant workout station anywhere.
Before you start any workout, give your anchor a firm tug. Seriously. This two-second check is the single best thing you can do to prevent accidents.
The Secret to Results is Constant Tension
If there’s one rule for resistance band training, this is it: keep tension on the band through the entire movement. A dumbbell is heavy all the time, but a band only provides resistance when it’s stretched. The moment it goes slack, you lose the muscle-building stimulus.
The goal is to keep the muscle under load for the entire duration of the set. This means you should feel resistance from the very start of the movement to the very end—and all the way back.
To get this right, you might need to tweak your starting position. For a bicep curl, for example, that could mean stepping wider on the band to create more tension before you even start the curl.
Controlling Every Part of the Movement
It’s natural to focus on the ‘lifting’ part of an exercise (the concentric phase) and then just let the band snap back. But the real magic for building strength happens when you control the ‘lowering’ part (the eccentric phase).
Fighting the band's pull on the way back forces your muscles to work harder, for longer.
A great rule of thumb is the 1-2 count: take one second for the main push or pull, then take a slow, controlled two seconds to return to your starting position. This control not only builds muscle more effectively but also protects your joints from jerky movements, turning a simple exercise into a powerful, mindful practice. You can enhance this focus by using a supportive meditation cushion to centre yourself before starting. This principle of mindful control is just as crucial in other practices, a theme we explore in our guide on how to enhance your yoga practice with props. This focus is what bridges the gap between pure strength training and mindful movement.
The Best Full Body Resistance Band Exercises
Alright, you've got the basics of using bands safely and effectively down. Now for the fun part—putting them to work. Resistance bands are fantastic because they let you target every major muscle group, helping you build a strong, balanced body from just about anywhere.
Forget needing a gym full of complicated equipment. All you really need is a band, a bit of space, and your favourite comfy activewear to get going. This section will be your go-to library for a complete, head-to-toe workout. We'll walk through the key movements for your lower body, upper body, and core, with clear instructions to make sure your form is locked in.
Essential Lower Body Exercises
Your lower body is your powerhouse, home to the biggest muscles you've got. Keeping your glutes, quads, and hamstrings strong is vital for everything from explosive athletic moves to simply holding good posture throughout the day.
-
Banded Glute Bridges: Lie on your back with your knees bent and feet flat on the floor. Loop a mini-band just above your knees. Drive through your heels to lift your hips up, actively pushing your knees outward to maintain tension on the band. Give your glutes a good squeeze at the top before slowly coming back down. This one is an absolute killer for waking up the entire glute complex.
-
Banded Squats: Stand with your feet about shoulder-width apart. You can place a loop band just above your knees, or you can stand on it and hold the other end at shoulder height. As you lower down into a squat—like you’re sitting back into a chair—keep your chest up and focus on pushing your knees out against the band. That little addition makes your hip abductors work overtime, which is brilliant for building stability.
-
Lateral Band Walks: Pop a mini-band around your ankles or just above your knees. Get into a slight squat position, bending at the knees and hips. Take slow, controlled steps to the side, making sure your feet stay parallel and the band stays tight the whole time. You'll feel this one light up your gluteus medius, a key muscle for keeping your hips stable.
Powerful Upper Body Movements
A strong upper body isn't just for looks; it's crucial for everyday function. Bands are perfect for hitting your back, chest, shoulders, and arms, often challenging them in ways that traditional weights can't.
One of the biggest myths is that bands are only for light "toning." The truth is, they can be just as effective as traditional weights for building real strength. Research has shown that the strength gains you can get from bands can actually match what you’d achieve with dumbbells or weight machines, making them a seriously effective tool for muscle development.
Here are a few upper-body staples to get into your routine:
-
Seated Banded Rows: Sit on the floor with your legs out straight and loop a band around the middle of your feet. Grab the ends and pull back, focusing on squeezing your shoulder blades together. Imagine you're trying to pinch a pencil between them. This is one of the best moves out there for building back strength and fixing that slouchy, rounded-shoulder posture.
-
Banded Chest Press: Lie on your back and wrap a loop band across your upper back, holding the ends in each hand. You could also anchor the band to something sturdy behind you. Push your hands forward and up, just like a bench press, and really concentrate on squeezing your chest muscles at the top of the movement.
-
Overhead Triceps Extensions: Whether you're standing or sitting, hold one end of a band behind your lower back. With your other hand, reach over your shoulder and grab the top of the band. Extend that arm straight up to the ceiling, keeping your elbow pointed forward. This does an amazing job of isolating the triceps.
-
Bicep Curls: Stand on the middle of a tube band with both feet. Grip the handles, keep your elbows tucked in at your sides, and curl your hands up towards your shoulders. Squeeze your biceps hard at the top, then control the movement as you lower back down.
Pro Tip: The secret sauce here is the mind-muscle connection. Don't just go through the motions. On every single rep, focus intently on the muscle you're trying to work. Picture it contracting and lengthening. That mental focus can make a huge difference in your results.
Core-Strengthening Exercises
A strong core is the anchor for all your movement, providing stability and helping transfer power between your upper and lower body. Adding bands to core work introduces a whole new level of challenge. If you want to get nerdy about the specific muscles at play, this anatomical guide to resistance band exercises is a brilliant resource.
-
Banded Dead Bugs: Lie on your back, bend your knees to a 90-degree angle, and loop a mini-band around your feet. Brace your core, pressing your lower back into the floor. Slowly extend one leg straight out, pushing against the band’s resistance while keeping the rest of your body absolutely still. Return to the start and switch sides.
-
Pallof Press: Anchor a band at chest height to a sturdy post or door anchor. Stand sideways to the anchor point and hold the band with both hands at the centre of your chest. Press your hands straight out in front of you, fighting the band’s desire to twist your torso. This anti-rotation exercise is incredible for building that deep, stabilising core strength.
Building Your Weekly Resistance Band Routine
Knowing a handful of exercises is great, but piecing them together into a smart, effective weekly plan is where the real progress happens. A good routine makes sure you’re hitting all your major muscle groups, getting enough rest, and consistently pushing yourself just enough to get stronger.
The key here is consistency, not complexity. You don't need some wildly different workout for every single day of the week. Honestly, a well-rounded, full-body routine that you can stick to a few times a week is a fantastic way to build that foundational strength and start seeing real results.
Structuring Your Workouts
Before we jump into sample plans, let’s talk about the basics of putting it all together. How often should you train? How many reps should you aim for? It all comes down to your current fitness level and what you want to achieve.
As a solid starting point, aim for 2-4 full-body sessions per week. It’s crucial to have at least one rest day in between to give your muscles the time they need to repair and grow stronger.
For each exercise, a good target is 2-4 sets of 8-15 repetitions.
The real sweet spot is finding a band resistance that makes those last couple of reps in each set feel genuinely challenging. If your form starts to break down, it's too heavy. If you can breeze through 15 reps without breaking a sweat, it's definitely time to grab a stronger band.
Sample Beginner Workout Schedule
For anyone just starting out, a simple full-body plan is the perfect way to build good habits and master the movements. The table below outlines a 3-day split that hits everything you need without feeling overwhelming.
| Day | Focus | Key Exercises |
|---|---|---|
| Day 1 | Full Body | Banded Squats, Banded Chest Press, Seated Banded Rows |
| Day 2 | Rest | Active recovery like walking or stretching is a great option. |
| Day 3 | Full Body | Banded Glute Bridges, Banded Dead Bugs, Overhead Press |
| Day 4 | Rest | Let your muscles recover. |
| Day 5 | Full Body | Banded Squats, Seated Banded Rows, Banded Glute Bridges |
| Day 6 | Rest | Active recovery. |
| Day 7 | Rest | Full rest day. |
This schedule provides a balanced approach, giving you plenty of time for recovery while ensuring you stay consistent.
The Beginner's Foundation Plan
If you're new to resistance training, your main focus should be on mastering your form and just showing up. This plan is designed to be straightforward and effective, hitting all your major muscle groups without being too much to handle.
How often: 2-3 times per week on non-consecutive days (like Monday and Thursday, or Tuesday, Thursday, and Saturday).
Here’s what a sample full-body day looks like:
- Banded Squats: 3 sets of 10-12 reps
- Banded Glute Bridges: 3 sets of 12-15 reps
- Seated Banded Rows: 3 sets of 10-12 reps
- Banded Chest Press: 3 sets of 10-12 reps
- Banded Dead Bugs: 3 sets of 10 reps per side
This routine gives you a balanced workout that builds strength and stability across your entire body. Simple, but incredibly effective.
Intermediate Intensity Builder
Once you're comfortable with the basics and can nail the beginner routine with good form, it’s time to dial things up. This intermediate plan introduces more complex movements and increases the volume to kickstart new muscle growth.
How often: 3 times per week (a classic Monday, Wednesday, Friday split works well).
- Banded Squats: 4 sets of 8-12 reps
- Lateral Band Walks: 3 sets of 15 steps per side
- Seated Banded Rows: 4 sets of 8-12 reps
- Overhead Triceps Extensions: 3 sets of 10-15 reps
- Bicep Curls: 3 sets of 10-15 reps
- Pallof Press: 3 sets of 8-10 reps per side
Advanced Strength Challenge
Ready to really push your limits? This advanced routine ramps up the intensity and volume. The goal here is to maximise muscle tension and drive some serious strength gains.
How often: 3-4 times per week. You could stick with a full-body routine or start splitting it into upper and lower body days.
Here’s what a full-body advanced day could look like:
- Banded Squats (heavier band): 4 sets of 6-10 reps
- Banded Glute Bridges (single leg): 3 sets of 10-12 reps per side
- Banded Rows (standing): 4 sets of 8-12 reps
- Banded Chest Press (anchored): 4 sets of 8-12 reps
- Bicep Curls & Overhead Triceps Extensions (superset): 3 sets of 10-12 reps each
- Pallof Press: 4 sets of 10-12 reps per side
No matter which plan you're following, don't forget how important post-workout recovery is. Fuelling your body properly helps repair muscle tissue and gets you ready for your next session. A high-quality vegan protein powder is an excellent way to support your recovery. For an extra boost, consider incorporating adaptogenic supplements from our Teelixir range to support your body's resilience.
Using Bands for Mobility and Active Recovery
Beyond just building muscle, resistance bands are incredible tools for improving your mobility and speeding up active recovery. Their gentle, accommodating resistance is perfect for unwinding after a tough workout or just working through the stiffness from a long day hunched over a desk.
Think of it as a dynamic alternative to boring old static stretching. Using a lighter band during your cool-down on a comfortable yoga mat lets you guide your limbs through a greater range of motion, gently coaxing those tight muscles to release. This controlled movement not only improves flexibility but also helps flush out metabolic waste—a key step in reducing that dreaded next-day soreness.
Strengthening Your Foundation
There’s a reason physios absolutely love resistance bands: they are incredibly effective at targeting the small stabiliser muscles around your joints. These are the unsung heroes that protect your shoulders, hips, and knees from injury by giving them the support they desperately need.
When you perform exercises with bands, you’re not just working the big "mirror muscles." You're actually strengthening the entire kinetic chain from the ground up.
- For the Shoulders: You can’t beat banded external rotations for strengthening the rotator cuff, which is a notorious weak spot for many people.
- For the Hips: Clamshells and lateral leg raises with a mini-band are fantastic for targeting the gluteus medius, a crucial muscle for keeping your pelvis stable.
- For the Knees: Something as simple as seated leg extensions with a light band can help strengthen the muscles that support the kneecap.
This kind of targeted work is almost impossible to replicate with free weights alone and is absolutely fundamental for long-term joint health and preventing injuries down the track.
By weaving these gentle, focused movements into your routine, you build a much more resilient body. It’s not about lifting heavy; it’s about creating intelligent, balanced strength that supports everything else you do.
Functional Strength for Every Age
The beauty of resistance bands is that their benefits extend to all ages and fitness levels, proving especially valuable for maintaining functional strength as we get older. In fact, research clearly highlights their role in enhancing physical functioning in older adult populations.
Simple, chair-based resistance band exercises can significantly improve muscle strength, balance, and even lung capacity, making everyday activities easier and safer. You can explore more about these findings and the versatility of resistance bands on Wikipedia.
These straightforward, seated exercises are a safe and effective way to boost mobility without putting unnecessary stress on the joints, making them a perfect addition to any wellness routine. To create a truly restorative environment, set up one of our essential oil diffusers with a calming scent like lavender while you perform your mobility work.
A solid active recovery plan is multi-faceted, and combining different methods often yields the best results. While bands are excellent, learning about foam rolling techniques to maximise recovery can provide another powerful layer of relief. For those seeking the next level of recovery, a session in a portable ice bath can significantly reduce muscle inflammation.
Common Mistakes to Avoid (And How to Fix Them)
Resistance bands are incredibly effective, but like any piece of gym gear, there’s a right way and a wrong way to use them. Getting the little details right not only keeps you safe but makes sure every single rep counts.
One of the biggest mistakes I see is people letting the band snap back on the return. They focus all their energy on the pull or push, then just let go. The real gold is in that slow, controlled return—what trainers call the eccentric phase. Fighting the band’s pull on the way back is where you build incredible strength and control. It effectively doubles the value of every exercise.
Another classic pitfall? Grabbing a band that’s way too heavy. It’s an ego thing sometimes, but it just forces your body into awkward, contorted positions. This puts a heap of stress on your joints and completely stops the right muscles from doing their job. You want to feel the muscle working with perfect form, not just wrestling with the thickest band you can find.
Keeping Your Bands in Top Shape
Just like you’d look after any other bit of equipment, your bands need a little TLC to go the distance. This isn’t just about making them last longer; it’s a critical safety check. A well-cared-for band is a safe band.
- Inspect Before Every Single Use: This is non-negotiable. Give your band a quick stretch and a good look over its entire surface. Check for any tiny nicks, tears, or worn spots, paying close attention to where it connects to handles or anchors. A tiny tear can turn into a full-blown snap under tension.
- Clean Them Properly: After you’ve worked up a sweat, just wipe your bands down with a damp cloth. Steer clear of harsh soaps or chemical cleaners, as they can break down the latex or rubber over time.
- Store Them Correctly: Sunlight and extreme temperatures are the enemies of resistance bands. UV light makes the material brittle and far more likely to snap. The best bet is to hang them on a peg or keep them stored loosely in a gym bag, away from direct heat.
Here’s a simple rule I live by: If in doubt, throw it out. A new band is a small price to pay compared to the risk of one snapping on you mid-pull. It always pays to be cautious.
Nailing Your Setup
Your workout is only ever as safe as your anchor point. A wobbly anchor is just asking for trouble, and a band flying back at you is no joke. Before you start an exercise, always give your anchor a few solid tugs to make sure it’s not going anywhere. Whether you’re using a door anchor, a solid pole, or even your own body, be 100% sure it can handle the force.
Finally, think about your alignment. The band should always be pulling in a direct, straight line with the movement you’re doing. If the angle is off, you’re not just making the exercise less effective; you're putting weird, shearing forces on your joints. Take that extra moment to check your setup and line everything up—it’ll lead to much safer and more powerful workouts.
Your Resistance Band Questions Answered
When you're just getting started, it's natural to have a few questions. Let's tackle some of the most common ones so you can feel confident every time you pick up your bands.
Can You Actually Build Muscle With Resistance Bands?
Yes, absolutely. Muscle growth boils down to one key thing: mechanical tension. Your muscles don't really care if that tension comes from a heavy dumbbell or a stretchy band—they just know they're under load and have to adapt.
The secret sauce is progressive overload. By gradually moving to stronger bands, adding a few more reps, or slowing down your movements to increase time under tension, you create the stimulus your muscles need to get stronger and grow.
How Do I Choose The Right Resistance Level?
Here’s a simple rule of thumb I always share: pick a band that makes the last two or three reps of your set a real challenge, but not so hard that your form falls apart. You should feel the struggle, but it needs to be a controlled one.
If you can't hit your target rep count without cheating, the band's too heavy. On the flip side, if you finish a set feeling like you could do ten more, it’s too light. Don't be surprised if you need different bands for different exercises—a heavy one for squats and a much lighter one for bicep curls is perfectly normal.
How Often Should I Do Resistance Band Workouts?
For building general strength and fitness, a great goal is 2 to 4 full-body sessions a week on non-consecutive days. This schedule gives your muscles the downtime they need to repair and grow stronger.
Always listen to your body. Recovery is just as important as the workout itself. Make sure you prioritise those rest days and never push through sharp pain. Consider a calming post-workout ritual with a cup of ceremonial grade matcha or a relaxing tea made with Blue Lotus to aid relaxation.
At Wellness Apothecary, we believe in equipping you with the right tools for your entire wellness journey. Whether you're building strength, enhancing recovery, or finding calm, explore our curated collections to support your goals.


